

How to Screen Record on Mac with Audio from Video :: Welcome to our comprehensive guide on how to screen record with audio on Mac. In this article, we will provide you with step-by-step instructions and useful tips to help you effectively screen record with audio on your Mac device. Whether you need to create video tutorials, capture gameplay, or record webinars, we’ve got you covered. Let’s dive right in!
Section 1: Setting up your Mac for Screen Recording
Before you start screen recording on your Mac, there are a few initial setup steps you need to follow:
1.1 Update your macOS
To ensure optimal performance and access to the latest features, it is essential to keep your macOS up to date. Follow these steps to check for updates:
1. Click on the Apple menu in the top-left corner of your screen.
2. Select “System Preferences” from the drop-down menu.
3. Choose “Software Update.”
4. If updates are available, click “Update Now” and follow the on-screen instructions to install them.
1.2 Adjust Sound Preferences
To capture audio during your screen recording, you need to configure the sound preferences on your Mac:
1. Open “System Preferences” from the Apple menu.
2. Click on “Sound.”
3. Go to the “Input” tab.
4. Select the desired audio input source, such as the built-in microphone or an external microphone.
Section 2: Choosing the Right Screen Recording Software
When it comes to screen recording on Mac, you have various software options available. Here are a few popular choices:
2.1 QuickTime Player
QuickTime Player is a built-in application on Mac that allows you to capture your screen with audio easily. Follow these steps to use QuickTime Player for screen recording:
1. Launch QuickTime Player from the Applications folder or by searching in Spotlight.
2. Click on “File” in the menu bar.
3. Select “New Screen Recording” from the drop-down menu.
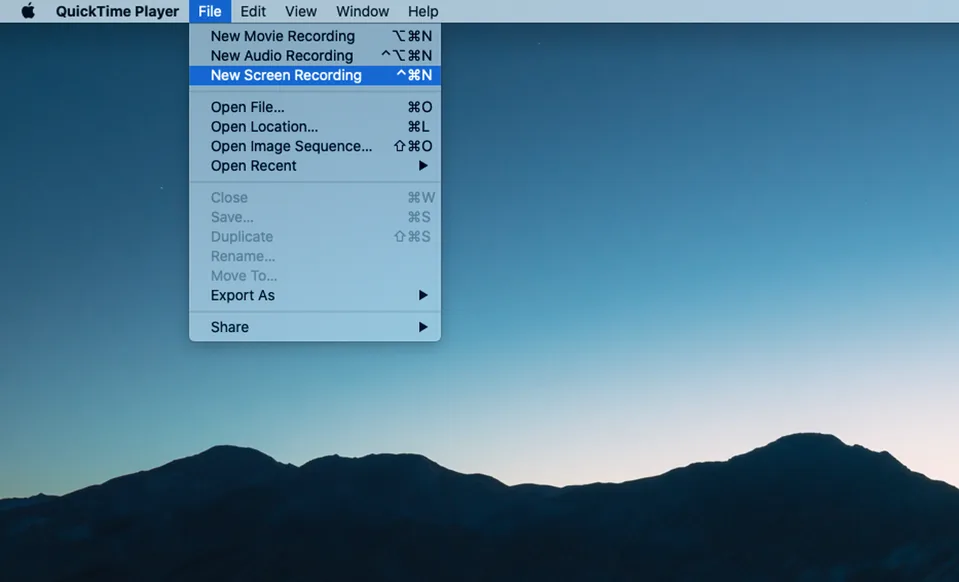
4. Click the small arrow next to the record button to choose audio input options.
5. Click the record button to start your screen recording.
2.2 ScreenFlow
ScreenFlow is a professional screen recording and video editing software for Mac. It offers advanced features and editing capabilities. To use ScreenFlow for screen recording:
1. Download and install ScreenFlow from the official website.
2. Launch the ScreenFlow application.
3. Click on the red record button in the toolbar.
4. Select the screen area you want to record.
5. Enable audio recording by clicking on the microphone icon in the toolbar.
6. Click the record button again to start recording.
Section 3: Recording Your Screen with Audio
Now that you have set up your Mac and chosen the screen recording software, let’s proceed with recording your screen with audio:
3.1 Preparing for the Screen Recording
Before you start the actual recording, make sure you have everything set up for a smooth and uninterrupted process:
– Close any unnecessary applications or windows to avoid distractions.
– Organize your desktop and remove any clutter that may appear in the recording.
– Familiarize yourself with the screen recording software’s interface and settings.
3.2 Starting the Screen Recording
Follow these steps to begin your screen recording with audio:
1. Open the screen recording software you selected in Section 2.
2. Configure the recording settings, such as video quality and file format.
3. Position the recording frame over the area you want to capture.
4. Check that the audio input is correctly set up to capture the desired audio source.
5. Start the recording by clicking the record button or using the assigned hotkey.
3.3 Performing the Screen Recording
During the screen recording process, keep the following tips in mind:
– Speak clearly and audibly to ensure your audio narration is of high quality.
– Demonstrate actions and explain steps as you perform them on your screen.
– Use highlighting or annotation tools provided by the screen recording software to draw attention to specific areas.
3.4 Ending the Screen Recording
Once you have completed the screen recording, it’s time to stop and save the recording:
1. Return to the screen recording software’s interface.
2. Click the stop button or use the assigned hotkey to end the recording.
3. Review the recorded video to ensure it meets your requirements.
4. Save the recording to your desired location on your Mac.
Section 4: Editing and Exporting Your Screen Recording
After completing the screen recording, you may need to make edits or adjustments before sharing your video. Follow these steps to edit and export your screen recording:
4.1 Using QuickTime Player for Basic Edits
QuickTime Player offers basic editing features that allow you to trim, split, and rotate your screen recording. Here’s how to use QuickTime Player for editing:
1. Open your screen recording in QuickTime Player.
2. Click on the “Edit” option in the menu bar.
3. Choose the editing feature you want to apply, such as trim or split.
4. Make the necessary adjustments and save the edited recording.
4.2 Utilizing Advanced Editing Software
For more advanced editing capabilities, you can utilize professional video editing software like iMovie or Adobe Premiere Pro. These tools provide a wide range of editing features, including adding text, transitions, effects, and audio enhancements.
4.3 Exporting the Edited Video
Once you have completed the necessary edits, it’s time to export your screen recording as a final video file. Follow these general steps to export your video:
1. Open the video editing software you used for editing.
2. Select the “Export” or “Share” option from the menu.
3. Choose the desired video format, resolution, and quality settings.
4. Specify the destination folder and file name for the exported video.
5. Click “Export” or “Save” to start the exporting process.
Read More : Can I Screen Record on Mac? Step-by-Step Guide for Beginners
Conclusion
Congratulations! You have successfully learned how to screen record with audio on your Mac. By following the steps outlined in this comprehensive guide, you can create professional-looking screen recordings for various purposes.
Remember to utilize the appropriate screen recording software, configure your audio preferences, and make use of editing tools to enhance your videos. Now it’s time to put your knowledge into practice and create outstanding screen recordings!


