

How to Screen Record on Mac Keyboard Shortcut :: In this article, we present a comprehensive guide on how to efficiently screen record on Mac. Screen recording is a valuable feature that allows you to capture and share your screen activities, whether it’s for creating tutorials, recording gameplay, or demonstrating software functionality. By following the steps outlined below, you will be able to master the art of screen recording on your Mac and produce high-quality videos.
1. How to Screen Record on Mac Keyboard Shortcut
Mac computers come equipped with a built-in screen recording feature that offers a simple and effective way to capture your screen with keyboard shortcut. To initiate a screen recording, follow these steps:
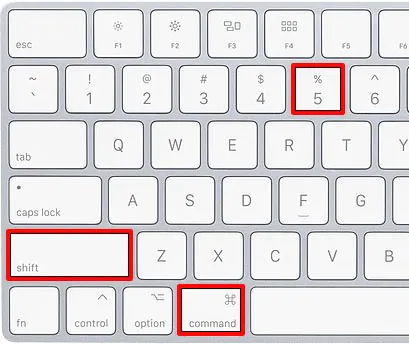
1. Press the Command + Shift + 5 keys simultaneously to open the screen recording toolbar.
2. The toolbar will appear at the bottom of your screen, providing various recording options.
3. Customize your recording settings, such as choosing the area to record, setting a timer, or including audio.
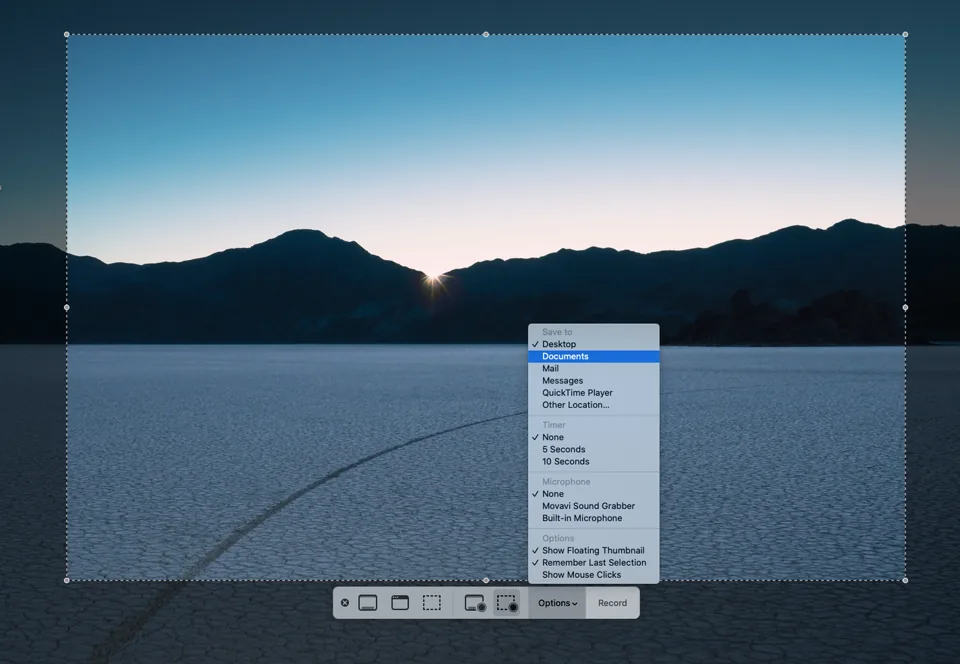
4. Click on the “Record” button to start the screen recording.

5. When you’re finished, click on the stop button in the menu bar or press Command + Control + Esc to end the recording.

2. Exploring Advanced Screen Recording Options
While the built-in screen recording feature is sufficient for most users, you may require additional functionality and flexibility for your recording needs. In such cases, third-party screen recording applications can be beneficial. These applications offer a range of advanced features, including:
– Enhanced editing capabilities
– Customizable recording settings
– Multiple output formats
– Annotation tools
– Webcam overlays
– And more
By leveraging these third-party applications, you can elevate the quality of your screen recordings and streamline your workflow.
3. Best Practices for Optimal Screen Recording Results
To ensure your screen recordings are of the highest quality, it is essential to follow some best practices. Consider the following tips:
a. Prepare Your Recording Environment
– Close unnecessary applications and background processes to optimize system resources.
– Disable notifications to prevent interruptions during the recording session.
– Clean up your desktop and remove any clutter for a more professional appearance.
b. Define Your Recording Objectives
– Determine the purpose of your screen recording and plan accordingly.
– Create a script or outline to guide your narration or steps, if necessary.
– Familiarize yourself with the content you’ll be recording to minimize mistakes.
c. Optimize Recording Settings
– Select the appropriate screen resolution and aspect ratio based on your target audience and intended display platforms.
– Adjust the frame rate to balance video smoothness and file size.
– Enable audio recording if you require voice narration or system audio.
d. Utilize Editing Tools
– Trim unnecessary footage from the beginning and end of your recording.
– Add captions, annotations, or highlights to emphasize key points.
– Incorporate transitions or effects to enhance the visual appeal of your video.
Read More : How to Video Screen Record on Mac: Tips and Tricks
Conclusion
In conclusion, mastering the art of screen recording on your Mac can greatly enhance your ability to create engaging and informative content. By utilizing the built-in screen recording functionality or exploring advanced third-party applications, you can tailor your recording process to suit your specific needs.
Remember to follow best practices and optimize your recording settings for optimal results. With practice and attention to detail, you’ll be able to produce high-quality screen recordings that captivate your audience.


