

Screen Recorder for Mac :: Welcome to our comprehensive guide on screen recording on Mac. In this article, we will walk you through the step-by-step process of screen recording on a Mac, covering everything from built-in methods to third-party software. Whether you need to create tutorials, capture gameplay, or save a video call, we’ve got you covered. Let’s dive right in!
Why Screen Recording on Mac is Important
Screen recording has become an essential tool for various purposes, both personal and professional. Whether you are a content creator, educator, software developer, or simply want to share something interesting on your screen, screen recording allows you to capture and share your actions with others effectively.
Built-in Screen Recording Options on Mac
Method 1: Using QuickTime Player
Mac users are fortunate to have QuickTime Player, a versatile multimedia player, which also doubles as a powerful screen recording tool. Follow these steps to record your screen using QuickTime Player:
1. Launch QuickTime Player from the Applications folder or search using Spotlight.
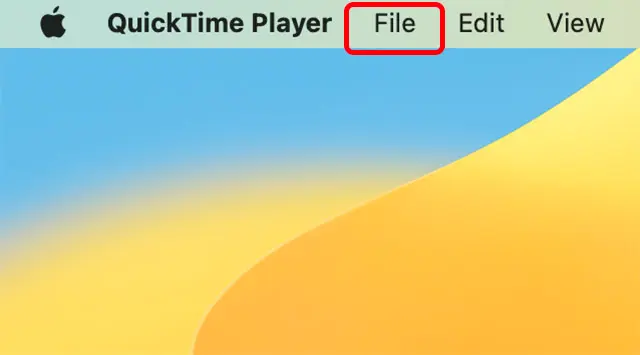
2. Click on “File” in the menu bar and select “New Screen Recording.”
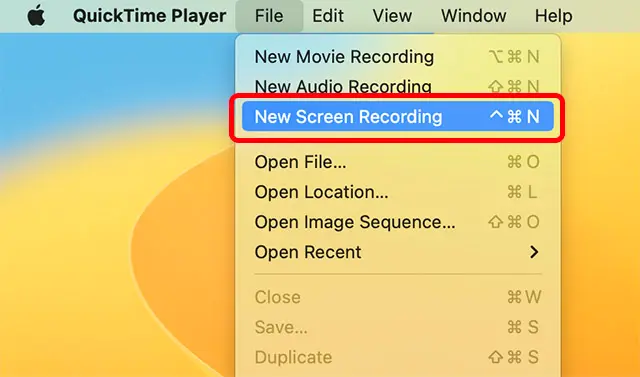
3. A screen recording window will appear with options such as microphone selection and recording quality.
4. Customize your recording preferences and click on the red “Record” button to begin capturing your screen.
5. To end the recording, click on the stop button in the menu bar or press the “Command + Control + Esc” keys simultaneously.

Method 2: Using macOS Mojave or Later
If you are running macOS Mojave or a later version, you have an additional built-in option for screen recording. Follow these steps:
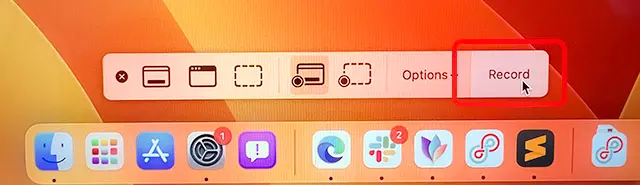
1. Press the “Command + Shift + 5” keys simultaneously. This will open the screen recording control panel.
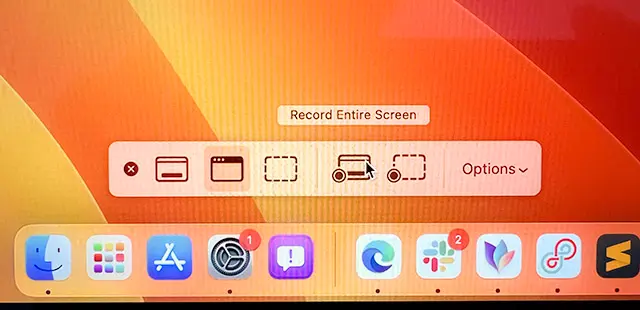
2. You will see options for recording the entire screen or a selected portion. Choose the desired option.
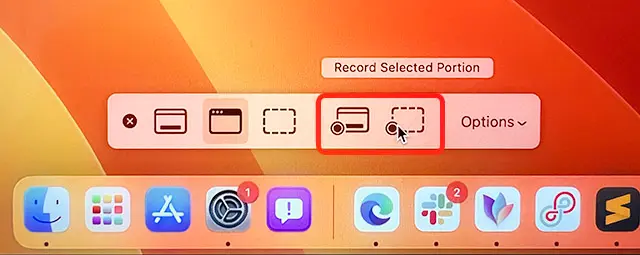
3. Customize additional settings such as microphone selection and timer delay, if needed.
4. Click on the “Record” button to start the screen recording.
5. To finish the recording, either click on the stop button in the menu bar or press the “Command + Control + Esc” keys.
Third-Party Screen Recording Software for Mac
While the built-in options on Mac provide basic screen recording capabilities, third-party software offers more advanced features and customization options. Here are a few popular choices:
1. ScreenFlow: ScreenFlow is a powerful screen recording and video editing software, perfect for professionals and enthusiasts. It offers a range of features, including multi-channel audio recording, video annotations, and post-capture editing capabilities.
2. Camtasia: Camtasia is another well-known screen recording tool that provides a comprehensive set of features for creating professional-looking videos. It offers screen recording, video editing, and a library of customizable templates to enhance your recordings.
3. OBS Studio: OBS Studio is an open-source screen recording and live streaming software. It is highly customizable, allowing you to capture multiple sources, add overlays, and create scenes for professional-quality recordings.
These are just a few examples, and there are many other screen recording software options available for Mac. Explore different options based on your specific requirements and preferences.
Tips for High-Quality Screen Recording
To ensure your screen recordings are of the highest quality, consider the following tips:
1. Prepare your content: Plan your screen recording in advance, organize your desktop, and close any unnecessary applications or notifications that might interrupt the recording.
2. Use a good microphone: If you need to record audio along with your screen, invest in a high-quality microphone to ensure clear and crisp sound.
3. Select the appropriate resolution: Choose a resolution that strikes a balance between clarity and file size. Higher resolutions may result in larger file sizes, which can impact sharing and storage.
4. Consider frame rate: Higher frame rates offer smoother recordings, especially for capturing fast-moving content like gaming or animations. However, higher frame rates also increase the file size.
5. Utilize keyboard shortcuts: Familiarize yourself with the keyboard shortcuts provided by the screen recording software you are using. This will help you control the recording process more efficiently.
Read More : How to Screen Record on Mac: Comprehensive Guide
Conclusion
Screen recording on Mac is a versatile and powerful tool for capturing and sharing your actions with others. Whether you utilize the built-in options like QuickTime Player or opt for third-party software with advanced features, the ability to record your screen opens up a world of possibilities. Experiment with different methods, explore various software options, and unleash your creativity through screen recording. Happy recording!
Remember, screen recording is just one aspect of effective content creation and sharing. To maximize your visibility and reach, consider optimizing your content with relevant keywords, engaging titles, and well-structured descriptions. With the right combination of high-quality content and strategic SEO practices, your website can soar above the competition and outrank others in search engine results.


