

Screen Record on Mac :: In this comprehensive guide, we will walk you through the process of screen recording on Mac, providing you with step-by-step instructions and valuable tips. Whether you need to create tutorials, record gameplay, or capture important moments on your screen, we’ve got you covered. By following the methods outlined below, you’ll be able to screen record on your Mac like a pro.
Screen recording on Mac has become increasingly popular, enabling users to capture and share their screen activities effortlessly. Whether you’re a professional or a casual user, knowing how to screen record can be a valuable skill. In this guide, we will explore multiple methods to help you accomplish this task easily and efficiently.
1. Built-in Screen Recording
One of the advantages of Mac is its built-in screen recording feature, which eliminates the need for third-party software. To access this feature, follow these simple steps:
1. Open the application or screen that you want to record.
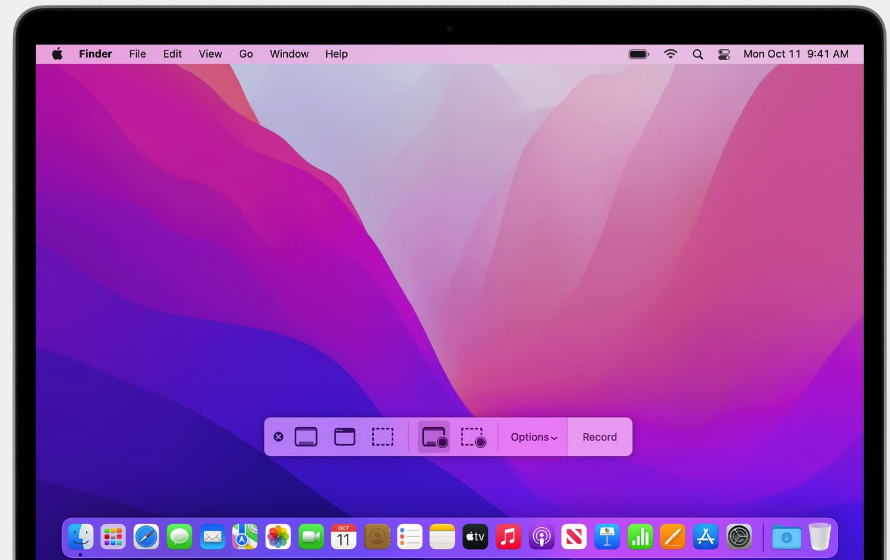
2. Press the “Command + Shift + 5” keys simultaneously to bring up the screen recording toolbar.
3. Choose the desired recording options, such as selecting a portion of the screen or recording the entire screen.
4. Click the “Record” button or press the “R” key to start the recording.
5. When you’re finished, press the “Stop” button in the menu bar or press the “Command + Control + Esc” keys to stop the recording.
2. Utilizing Third-Party Software
While the built-in screen recording feature on Mac is convenient, you may find that third-party software offers additional functionalities and customization options. Here are a few popular choices:
a. QuickTime Player
QuickTime Player is a versatile multimedia player that also includes screen recording capabilities. To use QuickTime Player for screen recording, follow these steps:
1. Open QuickTime Player, located in your Applications folder.
2. Click on “File” in the menu bar and select “New Screen Recording.”
3. Customize your recording options by clicking on the drop-down arrow next to the record button.
 4. Click the red record button to start the screen recording.
 5. When you’re done, click the stop button in the menu bar or press “Command + Control + Esc” to finish the recording.
b. OBS Studio
OBS Studio is a powerful open-source software used by professionals for screen recording and live streaming. Here’s how to use OBS Studio for screen recording on Mac:
1. Download and install OBS Studio from the official website.
2. Launch OBS Studio and go to the “Sources” panel.
3. Click on the “+” icon and select “Display Capture” or “Window Capture,” depending on your preference.
4. Configure the capture settings, such as selecting the display or window you want to record.
5. Click “Start Recording” in the controls section to begin the screen recording.
6. To stop the recording, click the “Stop Recording” button.
3. Advanced Recording Options
When screen recording on your Mac, you may encounter specific scenarios that require additional settings or configurations. Here are a few advanced recording options to enhance your screen recording experience:
a. Audio Recording
To include audio in your screen recordings, make sure to select the appropriate audio source. You can choose to record the system audio, microphone, or both, depending on your needs. Adjust the audio settings within your chosen screen recording software to achieve the desired outcome.
b. Webcam Overlay
If you want to add a personal touch to your screen recordings, consider including a webcam overlay. This feature enables you to record yourself simultaneously with the screen, allowing viewers to see your reactions or explanations. Most third-party screen recording software, including OBS Studio, provides an option to include a webcam overlay.
c. Shortcut Keys
Familiarize yourself with the shortcut keys provided by the screen recording software you are using. These shortcuts allow you to start, stop, pause, or resume recordings conveniently, saving you time and improving your workflow.
4. Editing and Enhancing Your Recordings
Once you’ve finished recording your screen on Mac, you may want to make some adjustments or edits to enhance the quality of your recordings. Consider the following options:
a. Trimming and Cropping
If there are unnecessary parts at the beginning or end of your recording, you can trim them using video editing software such as iMovie or Adobe Premiere Pro. Additionally, cropping specific sections of your recording can help emphasize important details and remove distractions.
b. Adding Annotations
Annotations can be valuable in providing additional context or highlighting specific areas of your screen recording. Utilize the annotation tools available in your video editing software to draw attention to important elements or add textual explanations.
c. Incorporating Transitions
To create a smooth and professional-looking final product, consider adding transitions between different sections of your screen recording. Transitions help create a cohesive flow and enhance the viewer’s experience.
5. Sharing and Exporting Your Recordings
Once you’ve completed the editing process, it’s time to share your screen recordings with your intended audience. Consider the following options for sharing and exporting your recordings:
a. Saving Locally
Save your recordings on your Mac’s local storage to access and share them easily. Choose a suitable file format, such as MP4 or MOV, to ensure compatibility with various devices and platforms.
b. Uploading to Cloud Storage
To avoid storage limitations and facilitate easy sharing, consider uploading your screen recordings to cloud storage services such as Google Drive, Dropbox, or OneDrive. This allows you to share a link to the recording instead of the actual file.
c. Sharing on Video Platforms
If you want to reach a broader audience, consider uploading your screen recordings to video platforms such as YouTube or Vimeo. These platforms offer built-in audiences and provide an opportunity for your content to gain visibility.
6. Best Practices for Screen Recording on Mac
To ensure optimal results and a seamless screen recording experience on Mac, consider the following best practices:
- Close unnecessary applicatio
- ns and disable notifications to minimize distractions during recording.
- Use a high-quality microphone to ensure clear and crisp audio.
- Optimize your screen recording settings to strike a balance between file size and quality.
- Preview your recordings before sharing or exporting to ensure they meet your expectations.
- Regularly update your screen recording software to access the latest features and improvements.
Read More : How to Screenshots on a Laptop
How to screen record on mac with sound
Sure! Here are the steps to record your screen using the Screenshot toolbar or QuickTime Player:

**Using the Screenshot Toolbar:
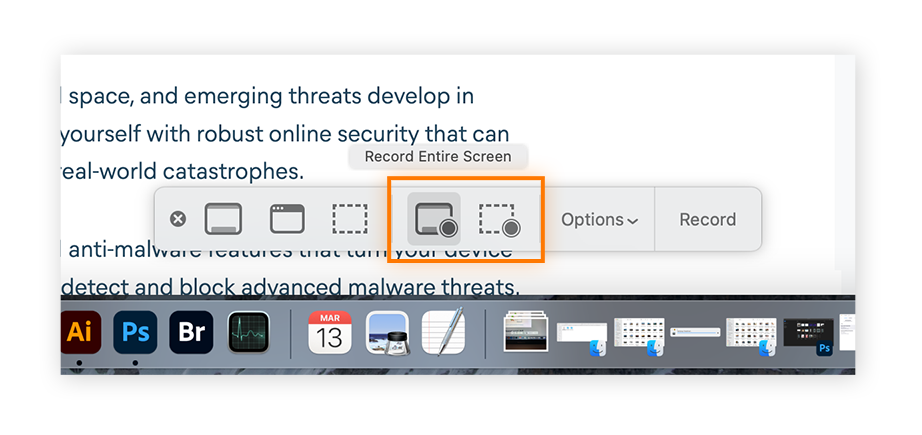
- Press the Shift, Command, and 5 keys together to bring up the Screenshot toolbar.
- The toolbar will appear on your screen with options to record the entire screen, record a selected portion of the screen, or capture a still image.
- To record the entire screen, click on the “Record Entire Screen” button.
- To record a selected portion of the screen, click on the “Record Selected Portion” button and drag your mouse to select the desired area.
- Once you’ve selected your recording option, click on the “Record” button to start the recording.
- To stop the recording, click on the “Stop” button in the menu bar or press Command-Control-Esc (Escape).
- The recording will be saved to your chosen location.
**Using QuickTime Player:**
1. Open QuickTime Player from your Applications folder.
2. Click on “File” in the menu bar and select “New Screen Recording” from the drop-down menu.
 3. A recording window will appear on your screen with recording controls.
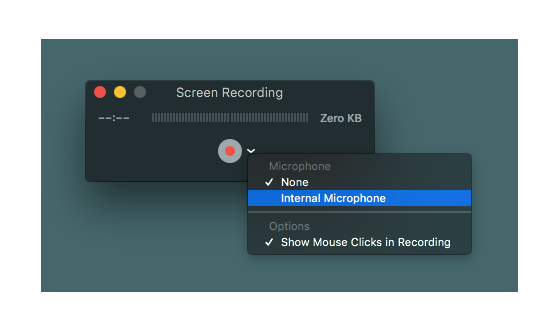
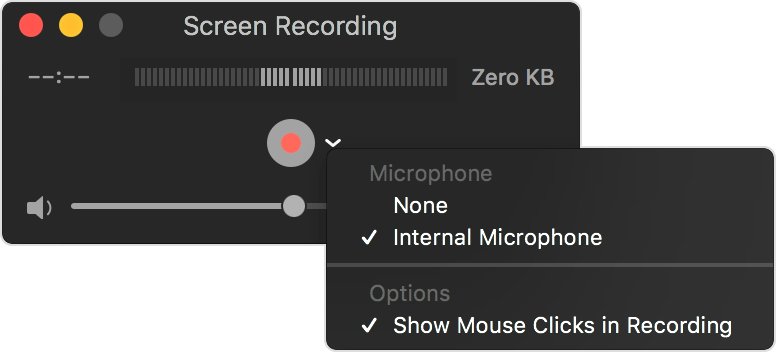
4. Before starting the recording, you can adjust the settings by clicking on the arrow next to the red record button. Here, you can select the microphone for recording audio and choose whether to show mouse clicks during the recording.
5. To start recording, click on the red record button.
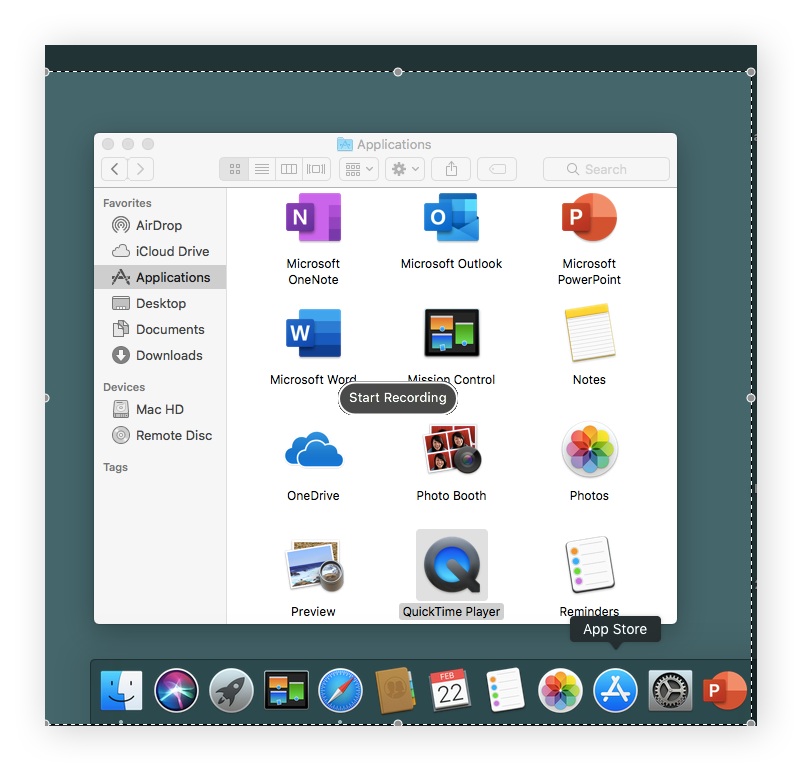
6. If you want to record the entire screen, click anywhere on the screen. If you want to record a specific portion, drag your mouse to select the desired area and then click “Start Recording” within that area.
7. To stop the recording, click on the “Stop” button in the menu bar or press Command-Control-Esc (Escape).
8. After stopping the recording, QuickTime Player will automatically open the recording. From there, you can play, edit, or share the recording.
These methods allow you to easily capture screen recordings on your macOS device.
Conclusion: Screen recording on Mac opens up a world of possibilities, allowing you to capture and share your screen activities effortlessly. By following the methods and tips provided in this comprehensive guide, you’ll be equipped with the knowledge and skills needed to create high-quality screen recordings on your Mac.
Remember to explore the various options available, experiment with different settings, and always strive for continuous improvement in your screen recording endeavors. Now that you have the knowledge and tools at your disposal, it’s time to unleash your creativity and start recording those amazing moments on your Mac!
Happy screen recording!


