

How to Screen Record on Mac :: Welcome to our comprehensive guide on how to screen record on Mac like a pro. In this article, we will provide you with step-by-step instructions and expert tips to help you master the art of screen recording on your Mac. Whether you want to create engaging tutorials, record gameplay, capture video calls, or save important online content, we’ve got you covered. So, let’s dive right in and unlock the full potential of screen recording on your Mac!
1. Enabling the Built-in Screen Recording Feature
One of the easiest ways to start screen recording on your Mac is by utilizing the built-in feature. Follow these simple steps to enable screen recording:
1. Go to the “System Preferences” on your Mac.
2. Click on “Displays” and select the “Displays” tab.
3. In the bottom-right corner, click on the “Show displays in menu bar” checkbox.
4. Close the “Displays” preferences and locate the display icon in the menu bar.
5. Click on the display icon and select “Start Recording” from the dropdown menu.
By following these steps, you will activate the built-in screen recording feature on your Mac, allowing you to capture any on-screen activity effortlessly.
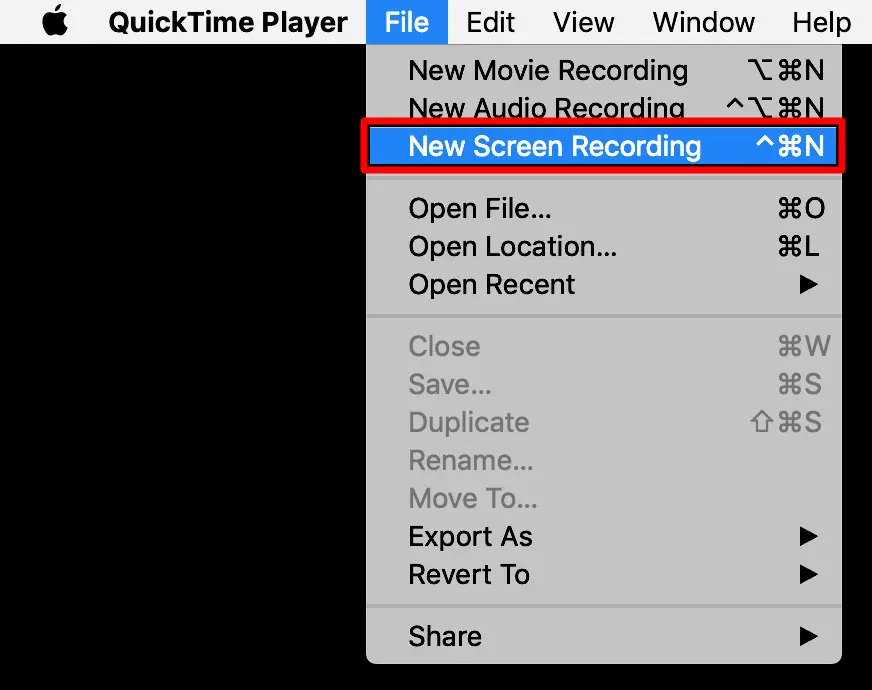
2. Using QuickTime Player for Screen Recording
QuickTime Player, a versatile media player on Mac, also offers screen recording functionality. Here’s how to use QuickTime Player for screen recording:
1. Open QuickTime Player from the Applications folder or by searching in Spotlight.
2. In the menu bar, click on “File” and select “New Screen Recording.”
3. A small screen recording control panel will appear. Click on the red record button to start recording.
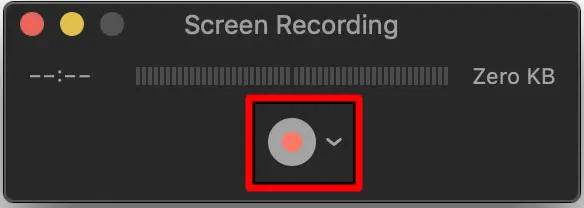
4. Customize your recording settings by clicking on the arrow next to the record button.
5. Once you’ve finished recording, click on the stop button in the menu bar.

6. Save your recording to the desired location on your Mac.
QuickTime Player provides a user-friendly interface for screen recording and offers various options for customization, making it a powerful tool for capturing screen activity.
3. Exploring Third-Party Screen Recording Applications
While the built-in and QuickTime Player screen recording options are great, you may also want to consider third-party applications that offer advanced features and functionalities. Here are some popular third-party screen recording applications for Mac:
1. ScreenFlow: A comprehensive screen recording and video editing tool that allows you to capture, edit, and share high-quality screen recordings.
2. Camtasia: A feature-rich screen recording and video editing software, ideal for creating professional-looking tutorials and presentations.
3. Snagit: A user-friendly screen capture and recording tool that offers an array of editing features to enhance your recordings.
These third-party applications provide additional capabilities, such as editing, annotations, and effects, giving you more control over your screen recordings and enabling you to produce polished and engaging content.
4. Advanced Settings and Techniques for Screen Recording
To take your screen recording game to the next level, here are some advanced settings and techniques you can implement:
1. Audio Input: Choose the desired audio input source for your screen recording, whether it’s the system audio, microphone, or a combination of both.
2. Screen Selection: Select a specific portion of your screen to record, allowing you to focus on a particular area or application.
3. Hotkeys: Set up hotkeys to conveniently start, pause, or stop your screen recording without needing to navigate through menus.
4. Frame Rate and Quality: Adjust the frame rate and video quality settings to optimize your recording’s smoothness and clarity.
5. Editing and Annotations: Utilize video editing software to enhance your screen recordings with annotations, transitions, and effects.
By leveraging these advanced settings and techniques, you can create professional-grade screen recordings tailored to your specific needs.
5. Troubleshooting Tips for Screen Recording
Sometimes, you might encounter issues or difficulties while screen recording on your Mac. Here are a few troubleshooting tips to help you overcome common challenges:
1. Low Disk Space: Ensure that you have sufficient storage space on your Mac to accommodate the screen recordings.
2. Audio Sync Issues: If you notice audio sync problems in your recordings, try adjusting the frame rate or using separate audio recording software.
3. System Performance: Close unnecessary applications and processes running in the background to optimize your Mac’s performance during screen recording.
These troubleshooting tips will assist you in resolving common issues and ensuring a smooth screen recording experience.
Read More : Mac Screen Record: The Ultimate Guide to Screen Recording on Mac
6. Conclusion
In conclusion, screen recording on your Mac is a valuable skill that opens up a world of possibilities for creating engaging content and sharing knowledge. Whether you prefer the built-in screen recording feature, QuickTime Player, or third-party applications, you now have the knowledge to confidently capture your screen activity. Remember to explore advanced settings and techniques to refine your recordings and troubleshoot any potential challenges. Happy screen recording!


