

How Print Screen on Laptop :: Welcome to our comprehensive guide on capturing screenshots on laptops! In this article, we will walk you through the step-by-step process of taking screenshots on different laptop models.
Whether you’re a tech enthusiast, a professional, or a casual user, being able to capture screenshots efficiently can be a valuable skill. We’ll cover various methods, includcing built-in tools and third-party software, to ensure you find the solution that suits your needs. Let’s dive right in!
Method 1: Using the Print Screen Key
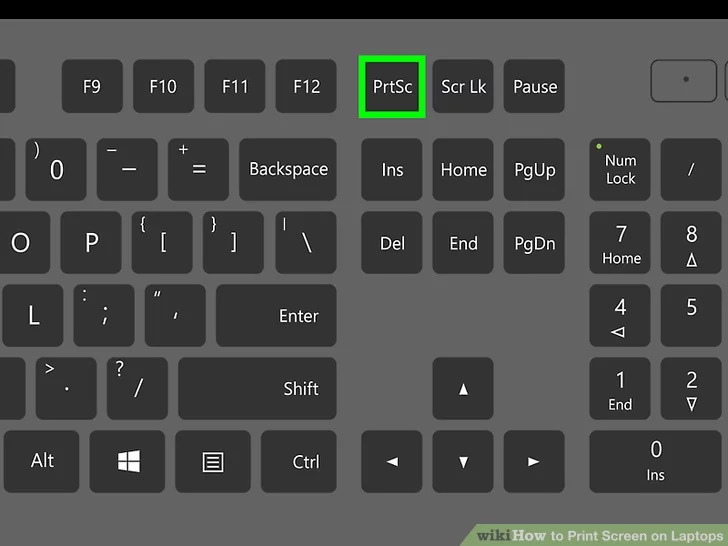
The Print Screen key, often labeled as “PrtSc” or similar, is a commonly available key on most laptop keyboards. This versatile key allows you to capture the entire screen or specific elements, such as open windows or the active application.
To capture the entire screen:
1. Locate the Print Screen key on your laptop keyboard.
2. Press the Print Screen key once.
The captured screenshot is now saved to your clipboard. You can paste it into an image editing program, such as Microsoft Paint, by pressing “Ctrl + V” or right-clicking and selecting “Paste.” From there, you can save the screenshot to your desired location.
To capture only the active window:
1. Ensure the window you want to capture is in focus.
2. Hold the “Alt” key on your keyboard.
3. Simultaneously press the Print Screen key once.
Similarly, the captured screenshot will be copied to your clipboard. Paste it into an image editing program to save and edit it further.
Method 2: Utilizing the Snipping Tool
Windows operating systems offer a built-in tool called the Snipping Tool, which provides more advanced screenshot options than the Print Screen key alone.
To use the Snipping Tool:
1. Press the “Windows” key on your keyboard.
2. Type “Snipping Tool” in the search bar and open the application.
3. Within the Snipping Tool, click “New” to initiate a screenshot capture.
4. Choose the desired snipping mode (e.g., rectangular, free-form, window, or full-screen).
5. Click and drag the cursor to select the area you wish to capture.
6. Release the mouse button to capture the snip.
Once captured, the Snipping Tool will display your screenshot, allowing you to annotate, save, or share it directly from the tool.
Method 3: Employing Third-Party Software
In addition to the built-in options, numerous third-party software applications offer enhanced screenshot capabilities. These tools often provide additional features such as delayed captures, scrolling captures, and image editing functionalities. Let’s explore a couple of popular options:
– Lightshot: Lightshot is a lightweight and user-friendly screenshot tool available for both Windows and Mac laptops. It allows you to capture specific regions, upload screenshots to the cloud, and conveniently share them with others.
– Snagit: Snagit is a powerful screenshot and screen recording software that offers a comprehensive set of tools for capturing and editing screenshots. With Snagit, you can capture scrolling windows, add annotations, and even create GIFs or videos of your screen.
Remember to research and choose a third-party software solution that aligns with your requirements and preferences.
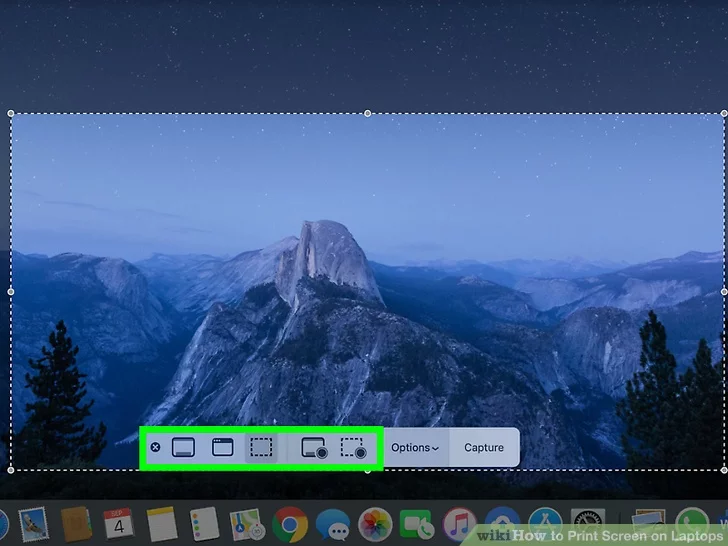
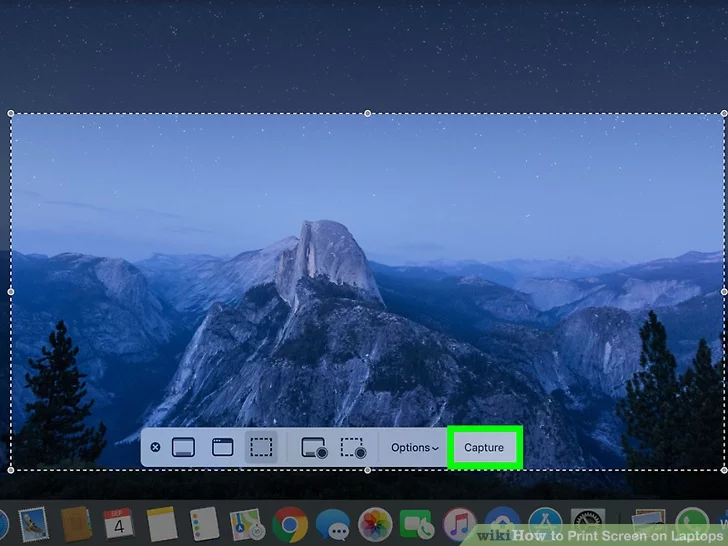
Method 4: Taking Screenshots on Mac Laptop
If you’re using a MacBook or any other Mac laptop, the process of capturing screenshots is slightly different from that of Windows laptops. Here’s how can do it:
1. Capture the entire screen: Press the combination of “Shift + Command + 3” simultaneously. The screenshot will be saved on your desktop.
2. Capture a specific portion: Press “Shift + Command + 4” together. Your cursor will change to a crosshair. Click and drag to select the desired area. Once you release the mouse button, the screenshot will be saved as a file on your desktop.
3. Capture a specific window: Press “Shift + Command + 4” together, then press the Spacebar. Your cursor will transform into a camera icon. Hover over the window you want to capture and click on it. The screenshot will be saved as a file on your desktop.
Troubleshooting Tips
If you encounter any issues while capturing screenshots on your laptop, here are a few troubleshooting tips that may help:
1. Update your drivers: Ensure your graphics drivers are up to date, as outdated drivers can sometimes cause compatibility issues with screenshot functionality.
2. Restart your laptop: A simple restart can often resolve temporary glitches that may be affecting your screenshot capabilities.
3. Check your keyboard settings: Verify that the Print Screen key or any related keyboard shortcuts are not remapped or disabled in your laptop’s keyboard settings.
4. Consult the manufacturer’s documentation: If you’re experiencing persistent difficulties, referring to your laptop’s user manual or the manufacturer’s support resources can provide valuable insights tailored to your specific model.
Read More: How to Take Screenshot with iPad Pro
Conclusion
Capturing screenshots on laptops is a fundamental skill that enhances productivity, facilitates communication, and enables efficient troubleshooting. In this guide, we explored several methods for taking screenshots on both Windows and Mac laptops.
Whether you prefer using the Print Screen key, the Snipping Tool, or third-party software, there’s a solution suited to your needs. Remember to choose the method that aligns with your preferences and explore additional features offered by third-party software for an enhanced screenshot experience. Start capturing and sharing your screen effortlessly today!


